How to do an effective backward planning?

Successfully organizing an event involves several steps. You need to choose a venue that fits the overall atmosphere, invite participants, and hire vendors to handle external services such as catering or entertainment. That’s the practical side.
Before reaching this stage, however, you must focus on event preparation: defining objectives, planning communication, and more. To ensure you stick to your timeline, you need to follow a schedule meticulously—and that’s where a backward schedule, or retroplanning, comes in. But what exactly is it? How can you create one easily without missing essential elements? Eventdrive shares tips for building an efficient backward schedule.
What Is a Backward Schedule?
A backward schedule is not your typical timeline. Normally, you start from the beginning and plan up to the end date. With a backward schedule, it’s the opposite! You begin with the project’s end date and plan backward.
This reversed planning method is especially effective in event management since the event date is often fixed and non-negotiable. Choosing a backward schedule has several advantages.
Better adherence to deadlines
Starting from the end date ensures all tasks are scheduled in advance, preventing delays. The result? Less stress and greater efficiency.
Clear start date identification
By planning tasks backward, you quickly determine when you need to start each step to stay on track.
Resource allocation clarity
Breaking tasks into steps allows you to better assess the time, budget, and personnel required for each phase. This makes overall budget planning more accurate.
Improved timeline visualization
Assigning deadlines to each task during backward planning helps you quickly identify if your targets are realistic or need adjustment. Remember to align your timeline with the SMART objectives you’ve defined beforehand.
Formats for Creating a Backward Schedule
Now that you understand the purpose of a backward schedule, let’s explore its possible formats. Depending on your preferences and the complexity of your event, a backward schedule can take various forms. At Eventdrive, we’ve tested several approaches and present three of the most common options.
The Gantt Chart
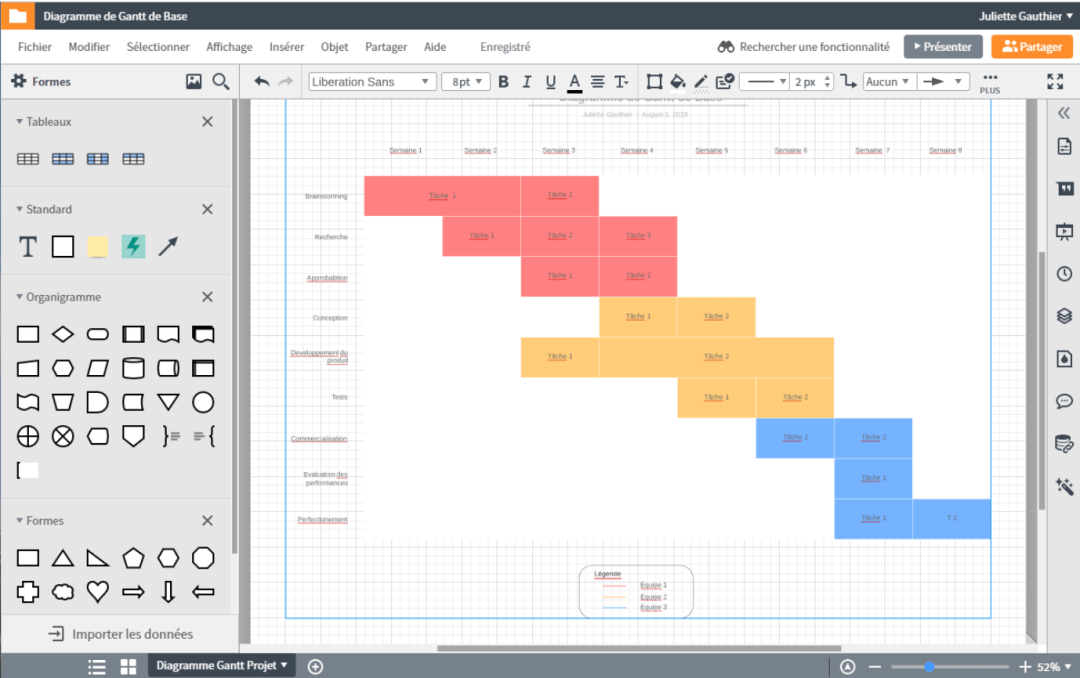
The Gantt chart is the most popular format, especially for complex projects. It organizes tasks and subtasks into a clear, visual layout.
- In the left column, list the detailed actions required.
- Across the top, include the project’s timeline.
- Each task is represented by a horizontal bar stretching across the necessary time frame.
This format allows you to overlap tasks easily and visualize their durations. Milestones can also be added for steps requiring specific approvals.
A Gantt chart is collaborative by nature, so ensure team members can work on it simultaneously, leave notes, and add comments.
There are many tools available to create an effective event-driven Gantt chart. We particularly like Smartsheet or LucidChart for example. Depending on the tools, you will be able to choose the way you want to visualize your backward planning and choose the structure that best suits you.

Excel Spreadsheet
If you don’t want to work on a Gantt chart, you can use a more classical method and create a table in Excel.
It is up to you to choose which format you prefer depending on your objectives. The advantage is that you can add as many options as you want, such as the budget per task or the human resources required for each action. However, the visual aspect of the table is less clear.
Even if you use a template, the first time you create your table, you will certainly need more time to adapt it to your needs and your business. But the advantage is that you will be able to start from this basis for future projects that you will have.
If you use Google Sheet, be aware that there are many extensions that can be added to make it easier to create your backward planning.
Tools type Asana
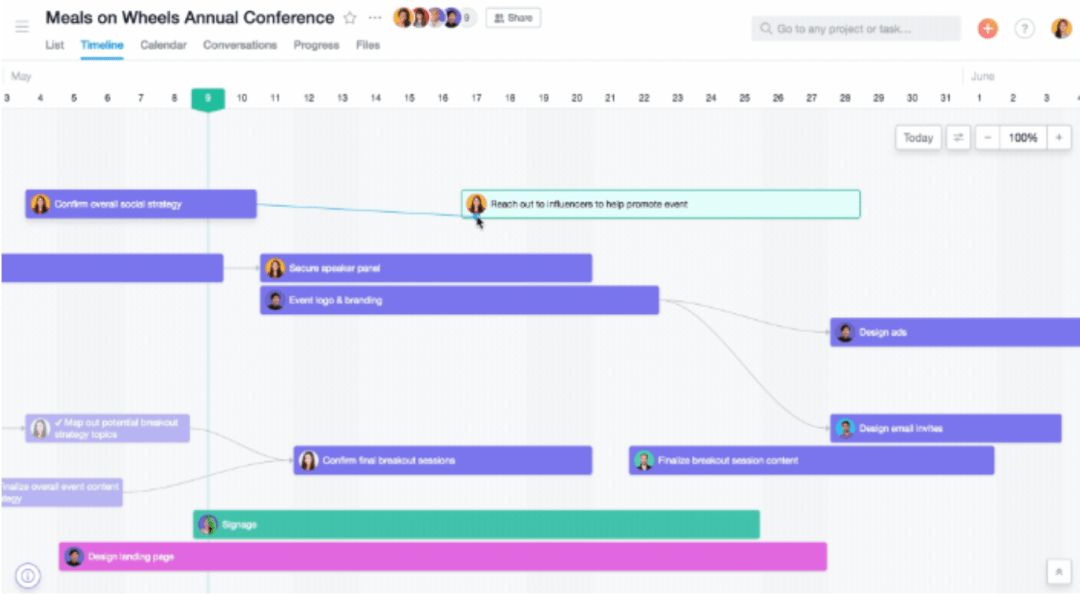
Other tools allow you to create a backward planning quickly. Asana, in particular, offers an event organization model that is easy to follow for your own project. You can then invite people from outside your organization, such as suppliers, to collaborate on your planning. As on a Gantt chart, you can set up a timeline and follow the same format with a header that defines the time period.
With Asana, you can also integrate your mailbox into the tool and automatically add notes or tasks to your backward planning. It is also possible to link the tool with Slack for example, a feature that is particularly useful when the event has started and you need to quickly manage the last points of the schedule.
You can also choose to view your schedule in different ways. If you prefer bulleted lists, the column function will be more relevant for you. But you can also choose a horizontal view with different colour codes.

The creation of a backward planning is an essential step in the organization of a project. In fact, it is one of the first, if not the first task to be carried out in order to succeed in a project. With a backward planning, you will have a clear visualization of the next steps, you will know perfectly the human and financial resources to be allocated to each step of the process and will be much more efficient when carrying them out.
- Tips (19)
- Virtual events (18)
- Event planning (14)
- Event communication (13)
- Hybrid events (12)
- Event Performance (8)
- Attendee experience (7)
- Seminars (7)
- Eventdrive (6)
- Other (4)
- Year-End Party (4)
- Conferences (3)
- ERG events (3)
- Invitation Management (3)
- Logistics Simplification (3)
- Post-event management (3)
- Team Building (3)
- Event Security (2)
- Event application (2)
- Event trends (2)
- In-person events (2)
- Product Launches (2)
- ROI (1)
- Registration management (1)